
Miniature landscape card
Greetings from Michigan! Fall is approaching and the school buses are back on the road. Where did our lovely summer go. In a wistful moment I decided I missed the pretty spring flowers so I decided it was time to recreate them. So I wanted to create something with bright spring colors. I love watching people paint but I am very scientific in nature and don’t know how I would even start to paint something that wasn’t a paint by number. I can modify things to meet my needs but do not consider myself creative. I remember as a child during art class the teacher would tell us what we were making and pass out the supplies. I was always one of the last ones to start a project. I would watch the other kids to see what they were going to do and then use their ideas to springboard into my own project. So in my scientific, uncreative mind I was fascinated with the Art Impressions watercolor stamps when I saw them for the first time. They advertise them as watercolors for people who need rules and guidelines and don’t think they are creative. I hesitated to buy them because in my frugal mind 10-18$ for 6 tiny stamps is not a good deal unless they hop on the paper and stamp themselves. So I waited until Joann Fabrics had them on sale and then used a coupon for them. I watched Art Impressions Watercolor Wednesdays on YouTube and tried to follow along. Here is what I made:
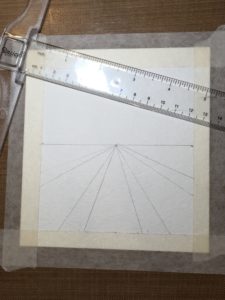
- Use watercolor paper cut to the size you want.
- I chose to tape a border around the paper down because I like the crisp border this creates once the tape is removed.
- Use a ruler to mark your horizon lines, and the lines where your spring flowers will bloom. Use pencil as you will erase them when you are done.
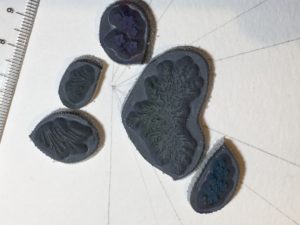
- Pick your stamps. I didn’t have exactly the ones in the video so I improvised. I used a “large” flower cluster, “small” flower cluster, long grass, short grass, and foliage stamp that would work for trees on the horizon.
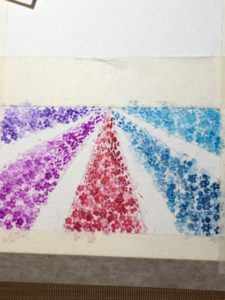
- Pick the colors you are going to work with. I used spectrum aqua markers. You must use a waterbased ink that will move with water. I choose some purples, pinks, blues, greens and Sepia.
- Start by stamping in the “large” flower clusters. You ink, then stamp 4-5 stamps in a row to get dark to light variations. work your way from front to back. Halfway back switch to the smaller dot flowers and continue between your lines filling in the blooms.
- Repeat for each of the five flower beds using different colors.

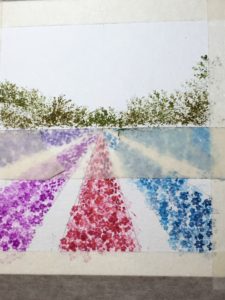
- Once dry use paper tape, post-it tape or painters tape to cover the horizon line.
- Use your foliage stamp to fill in the trees. I used two different color greens for depth. Remove the tape once dry.
- Use the long grass along the borders of the flower beds. As I worked back I switched to the smaller grass as things get smaller the further away they are. This I will do differently. I will be more sporadic with my grass. In my picture it looks like the gardener quit weeding partway down each row and left the job unfinished.
- This is where the water comes in, Start by dabbing at the flowers to soften them. Let them dry. Then dab at the trees. There are specific times you dab, feather or line something. Flowers and trees you dab with a mostly dry brush
- Feather the grass. Let dry.
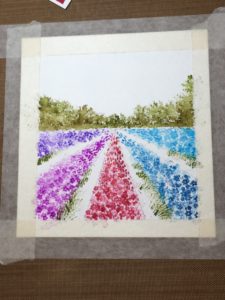
- Place some sepia ink on your mat and palette paint the dirt between the rows. Line the edges of the rows where the shadows would be. dot some pebbles into the row with the tip of you sepia marker.
- place your blue ink on the palette. Drop in the blue sky with lots of water to make the sky. Don’t be afraid to leave some white areas with no ink as they will be your clouds. When everything is bone dry remove the tape and erase your lines.
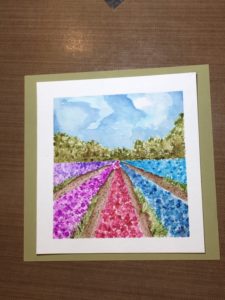
So over all it was an interesting experiment. It kinda looks like a garden from far away although, my gardener may have been a bit tipsy. Her row of purple flowers curves way too much instead of staying straight and she only weeded part way up the rows. Maybe it was hot and she wanted a strawberry daiquiri. My pebbles needed to be softened and my clouds aren’t puffy enough. My son said it looked like a very windy day based on my cloud formation….. I do feel a bit like a cheater but that is ok, I will never be able to create something like this without the help of the stamps. One of the things my fellow Crafting Angel Colette and I are always on the search for are big effect minimal effort techniques. With practice I think this could fit the bill.


One Comment
Celeste Reed
Wow! Carina, this is worthy of being framed! I love it!